How to Ensure Proper Boat Ventilation in 2026? This question matters more as boats carry tighter cabins, advanced electronics, and increasingly efficient engines. Why do boats need proper ventilation? Fresh air reduces heat, moisture, odors, and dangerous exhaust buildup. It also helps protect sleeping areas, electrical systems, upholstery, and stored equipment.
A practical ventilation review begins with the boat’s layout and operating conditions. Inspect intake vents, exhaust openings, ducting, fans, and bilge blower operation. Look for crushed hoses, blocked grilles, loose connections, and corrosion around fittings. A small cabin can feel acceptable at the dock, then become stale after hours underway. Engine spaces need special attention. Fuel vapors and carbon monoxide can collect in poorly ventilated areas, creating serious risks without obvious warning signs. Install and test suitable carbon monoxide alarms according to the manufacturer’s instructions. Follow the vessel builder’s manual and current marine safety guidance.
Good ventilation is not simply about adding a stronger fan. Air must enter, circulate, and leave through a sensible path. In 2026, smart monitors may help track temperature, humidity, and air quality, but they cannot replace physical inspections. That limitation matters. A sensor may work while a duct remains disconnected. Owners should record inspection dates and replace damaged components promptly. Professional marine technicians can verify airflow, wiring, and blower performance when conditions are uncertain. Even experienced boaters miss hidden restrictions. Keep learning. Review the system after refits, weather changes, and long storage periods. Small airflow details can decide whether a cabin feels dry and safe or damp and hazardous.
How to Ensure Proper Boat Ventilation in 2026?
Understanding Why Boat Ventilation Matters in 2026
Boat ventilation is a safety requirement, not merely a comfort feature. Modern cabins often contain tighter seals, larger electrical systems, and more heat-producing equipment. Without steady airflow, moisture settles on windows, lockers, wiring, and metal fittings. Corrosion can begin quietly.
Poor ventilation also allows odors and harmful gases to accumulate. Fuel vapors may collect in low spaces, while engines, heaters, and cooking appliances can produce carbon monoxide. This gas has no reliable smell. A working detector is essential, but it cannot replace fresh-air movement and correctly maintained exhaust routes.
Keep intake and outlet openings free from canvas, gear, dust, and insect nests. Check airflow before sleeping aboard, especially after closing cabin doors and hatches. Fans should be suitable for marine conditions and installed according to their instructions. Battery compartments need ventilation designed for the specific battery system, not a guessed solution.
Airflow is rarely perfect. Wind direction, rain, interior layout, and closed curtains can change its performance. It is easy to assume that one open hatch solves everything. It may not. During routine checks, feel for stale air in lockers and inspect damp corners for early mold or corrosion. Follow current local requirements and the vessel’s technical guidance. A qualified marine technician should assess persistent condensation, unusual odors, or suspected exhaust leakage.
This chart shows the air changes per hour (ACH) produced in a 30 m³ boat cabin at different ventilation flow rates. ACH is calculated by dividing airflow by cabin volume. Higher air exchange helps remove moisture, odors, and combustion-related contaminants, but ventilation openings should remain protected from rain and seawater, and fuel or battery compartments require dedicated ventilation arrangements.
How to Ensure Proper Boat Ventilation in 2026?
A boat’s ventilation needs begin with its design, not with the number of vents installed. A narrow day boat usually needs airflow around the engine space, fuel storage, and enclosed lockers. A cruiser with a deep cabin requires more careful air movement. Moisture can collect behind cushions, under mattresses, and inside poorly opened compartments.
Air must move.
Cabin layout changes the solution. A forward berth with a closed door may need a low intake and a high exhaust path. This creates gentle circulation without blowing directly onto sleeping areas. Galley spaces need ventilation near cooking surfaces, while heads require separate extraction to control humidity and odors. Never rely on one hatch to ventilate every compartment. Airflow often stops at bulkheads.
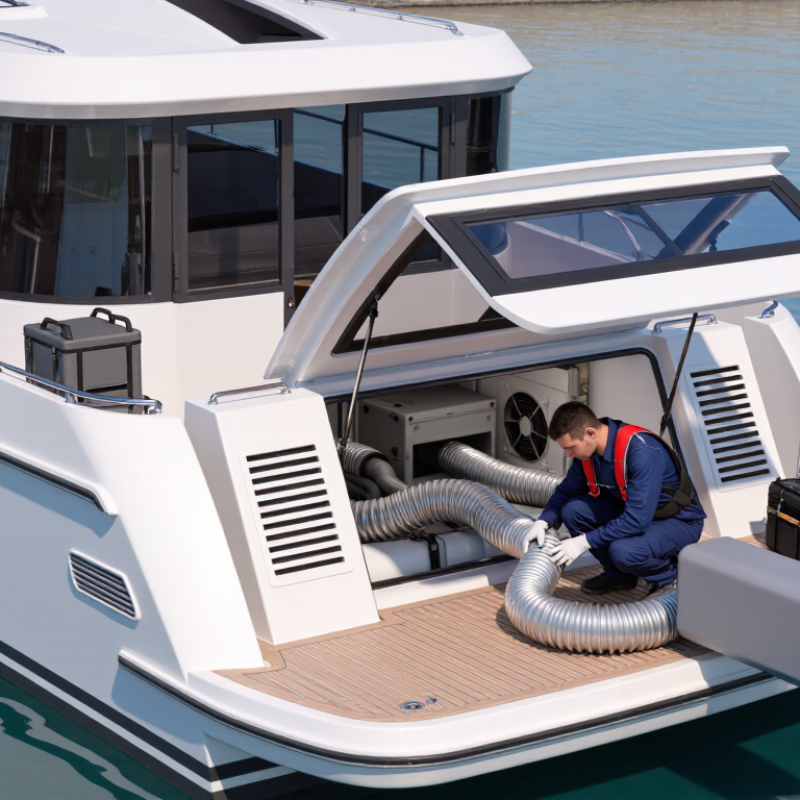
During practical inspections, I look for blocked grilles, damp wood, condensation marks, and stale air after several hours onboard. These details reveal problems that a basic equipment checklist can miss. Fans should match the compartment size and operate quietly enough for regular use. Their wiring and installation should follow current marine safety requirements.
Small errors matter. I once underestimated how much air a tightly sealed aft cabin needed. The fan worked, but moisture still gathered around the mattress corners. A second intake solved part of the issue, yet the layout remained imperfect. That is worth remembering: ventilation should be tested in real sleeping, cooking, and storage conditions, then adjusted with advice from a qualified marine surveyor when necessary.
Proper boat ventilation begins with matching each opening to its location and purpose. Low vents should support fresh-air entry, while high vents release warm, damp air. In an engine compartment, use ignition-protected exhaust fans and ducts routed outside the hull. Avoid placing intake and exhaust openings together. Otherwise, the system may recycle fumes.
The U.S. Coast Guard’s 2023 Recreational Boating Statistics recorded 3,844 incidents, 556 deaths, and 2,641 injuries. Ventilation cannot prevent every incident, but it can reduce heat, condensation, fuel vapor, and carbon monoxide risks. ABYC H-2 and ISO 9094 provide useful guidance for marine ventilation design. Check their requirements before installation.
Choose fans by airflow capacity, noise, corrosion resistance, and continuous-duty rating. A fan that moves air well in a workshop may perform poorly against long ducts and sharp bends. Measure the duct route first. Then calculate pressure loss, rather than trusting the box rating. Carbon monoxide detectors should complement ventilation, not replace it.
A practical test is simple. Run the fans, close cabin doors, and check whether air enters through intended inlets. Use smoke only in safe, nonflammable conditions. I once assumed a strong fan guaranteed good airflow; the blocked intake proved otherwise. Boat geometry changes everything. Recheck airflow after adding cushions, storage, screens, or a canopy. The U.S. Coast Guard also advises maintaining clear ventilation openings and testing detectors regularly.
| Boat Area | Primary Ventilation Goal | Recommended System | Typical Airflow Planning Range | Vent or Duct Guidance | Recommended Operating Practice | Important Safety Considerations |
|---|---|---|---|---|---|---|
| Cabin and Sleeping Areas | Remove moisture, odors, and accumulated carbon dioxide while maintaining comfort. | Opposing passive intake and exhaust vents, supplemented by a quiet reversible fan. | 4–8 air changes per hour | Place intake and exhaust openings apart from each other and avoid blocking them with cushions, curtains, or stored equipment. | Keep passive airflow available continuously when the boat is closed. Use powered ventilation during humid weather or overnight occupancy. | Do not rely on a single small fan if the cabin has limited fresh-air openings. |
| Saloon and Main Living Space | Control heat, humidity, cooking odors, and stale air in a larger occupied space. | Cross-flow ventilation using low-level intake vents and high-level exhaust vents; add a variable-speed fan when needed. | 6–10 air changes per hour | Use high-level exhaust paths because warm, humid air naturally rises. Keep intake openings away from exhaust outlets. | Open vents on opposite sides of the space when conditions allow. Use the fan at low speed for continuous background airflow. | Protect openings with insect screens and weather hoods without excessively restricting the free air area. |
| Galley and Cooking Area | Capture steam, grease, smoke, and cooking odors before they spread through the vessel. | Dedicated extraction fan or range hood vented directly outdoors. | 100–250 m³/h (59–147 CFM) |
Use a short, smooth, well-supported duct run with minimal bends. Exhaust should discharge outside, not into a cabin or enclosed locker. | Run the extractor during cooking and for several minutes afterward. Provide a separate make-up air path. | Do not place the exhaust outlet where fumes can be drawn into companionways, hatches, or air-conditioning intakes. |
| Heads and Shower Compartments | Reduce condensation, mold growth, and persistent odors. | Dedicated moisture-resistant exhaust fan with a passive make-up air opening under or near the door. | 80–150 m³/h (47–88 CFM) |
Locate the exhaust point high on the wall or ceiling and route the duct as directly as practical to an exterior outlet. | Operate during showers and for 15–30 minutes afterward. Leave the door or transfer opening partially open when practical. | Use marine-rated electrical components in damp locations and keep wiring protected from spray and condensation. |
| Engine Compartment — Gasoline Engine | Remove potentially hazardous gasoline vapors before engine start and limit heat accumulation. | USCG-compliant powered exhaust blower combined with properly located natural ventilation openings, where applicable. | Use the capacity required by the applicable regulation and compartment volume | Exhaust intake should be positioned low because gasoline vapors are heavier than air. Ducting should be secured, vapor-resistant, and routed to a safe exterior discharge. | Operate the blower for the period specified by the vessel’s regulations and manufacturer instructions before starting the engine. Inspect the compartment for fuel odors before ignition. | Never use a standard household fan. Follow applicable national regulations, including requirements for ignition protection and pre-start blower operation. |
| Engine Compartment — Diesel Engine | Supply combustion air, remove excess heat, and prevent fumes from migrating into occupied spaces. | Dedicated combustion-air intake plus powered or natural exhaust ventilation designed around engine heat rejection. | Size from engine manufacturer data and compartment heat load | Keep combustion-air paths separate from cabin air where possible. Use heat-resistant ducting and avoid sharp bends that increase resistance. | Provide airflow whenever the engine is running. Inspect intake screens, exhaust ducts, and fan belts regularly. | Insufficient combustion air can reduce performance and increase smoke or exhaust temperature. Do not obstruct engine-room openings. |
| Battery and Electrical Lockers | Limit heat buildup and, where applicable, disperse hydrogen generated during battery charging. | Dedicated high-level exhaust path with low-level make-up air; use a spark-safe or appropriately protected fan when powered extraction is required. | Follow battery and charger manufacturer requirements | Hydrogen rises, so exhaust openings should be located at the highest practical point. Keep ventilation paths independent from accommodation air where possible. | Maintain ventilation during charging if required by the battery system. Keep vents clear of cables, tools, and stored materials. | Do not install unprotected electrical devices in an area where explosive gas may accumulate. Follow the battery manufacturer’s installation instructions. |
| Bilge and Machinery Spaces | Reduce moisture and heat while preventing fuel vapors or exhaust gases from entering the cabin. | Low-level vapor extraction for applicable gasoline spaces, plus high-level heat exhaust and passive make-up air. | Determine from compartment volume, equipment heat load, and applicable code | Use smooth ducting, secure hose connections, and exterior discharge points positioned away from doors, hatches, and air intakes. | Keep bilge areas clean and dry. Inspect ducts and blower hoses for collapse, damage, oil contamination, or loose connections. | Ventilation does not replace proper fuel-system maintenance, leak detection, or carbon-monoxide protection. |
| Aft Cockpit Lockers and Storage Compartments | Prevent trapped humidity, mildew, and heat in enclosed storage spaces. | Passive louvered vents or screened vents; add a low-power circulation fan for large or frequently sealed lockers. | 2–6 air changes per hour | Use two openings at different heights or on opposing sides to encourage natural air movement. | Leave ventilation paths open when the boat is unattended, provided the vents are weather-protected. | Do not store fuel containers, solvents, or other vapor-producing materials in a compartment that lacks code-compliant ventilation. |
| Air-Conditioning and Heating System | Maintain comfort without creating condensation, pressure imbalance, or stagnant zones. | Balanced supply and return-air layout with correctly sized ducting and dedicated fresh-air provision where required. | Size according to equipment output and cabin volume | Keep return-air grilles unobstructed. Insulate cold-air ducts to reduce condensation and use short duct runs where practical. | Clean filters regularly and operate a short ventilation cycle after cooling in humid conditions to help dry the system. | Air-conditioning recirculation alone does not provide sufficient fresh-air exchange for occupied spaces. |
| Carbon Monoxide Protection | Detect dangerous combustion gases that ordinary ventilation may not remove reliably. | Marine-approved carbon-monoxide alarms installed in sleeping areas and other appropriate locations. | Not a substitute for airflow design | Follow the alarm manufacturer’s placement instructions and keep sensors away from direct spray, extreme heat, and blocked airflow. | Test alarms regularly, replace batteries or sensors as specified, and treat every alarm as a real emergency. | Ventilation cannot guarantee protection from exhaust backdrafting, nearby vessels, generators, or fuel-burning appliances. |
How to Ensure Proper Boat Ventilation in 2026?
Installing and Positioning Ventilation Components Correctly
Proper ventilation begins with placement, not fan power. Install intake vents where clean outside air can enter freely. Position exhaust vents higher than intake vents when possible. Warm, damp air naturally rises toward the upper sections of a cabin. Keep vents away from exhaust outlets, fuel-fill areas, and enclosed corners where fumes may collect. Ducts should run smoothly, with gentle bends and no crushed sections. I have seen a powerful fan perform poorly because its short duct was sharply folded.
Ventilation components need firm mounting and weather protection. Use fasteners that resist corrosion, and seal unwanted gaps around fittings. Do not block airflow with curtains, storage boxes, or loose insulation. Check airflow with a thin strip of tissue before finalizing the installation. It should move steadily, not flutter randomly. A marine technician or qualified surveyor can verify duct routing, electrical connections, and compliance with current safety requirements. My own early installations were sometimes too neat visually, but difficult to inspect later. Accessibility matters more than appearance.
Tips: Measure airflow before and after installation. Label intake and exhaust paths. Inspect screens for salt and insects. Test powered ventilation before operating enclosed machinery. Follow the vessel manual and applicable local regulations. Never assume a quiet fan is working. Test it.
Proper boat ventilation in 2026 begins with a hands-on inspection, not a quick glance at the vents. Open every locker, cabin, and engine-space access panel before testing airflow. Look for cracked ducts, loose grilles, blocked screens, salt deposits, and soft wood around fasteners. A flashlight and smoke pencil can reveal stagnant pockets that a fan’s sound hides. Check intake and exhaust paths separately. Air must enter cleanly and leave without sharp restrictions. Never test fuel-vapor areas with equipment that can create sparks.
Maintenance is usually small, repeated work. Rinse exterior screens with fresh water, remove insects, and dry damp compartments completely. Inspect fan blades for corrosion, then listen for uneven bearings or rattling mounts. Measure airflow before and after cleaning when possible. Simple notes expose gradual decline. Replace damaged ducting with heat- and moisture-resistant material, and secure every connection firmly. Do not seal a drain path because the cabin feels warmer. That mistake can trap condensation.
Upgrading should solve a measured weakness, not add noise or electrical load. Consider low-power fans, humidity control, or higher-flow exhaust where inspection supports the need. Verify wiring protection, fuse sizing, and switch locations against current marine standards. Keep emergency access clear. I have seen owners install powerful fans while leaving a blocked intake untouched. More capacity did not mean better ventilation. After upgrading, test at anchor and underway, with lockers closed and realistic loads. Record dates, readings, and unusual odors in the maintenance log.
Ventilation controls moisture, heat, odors, fuel vapors, and carbon monoxide. Tight cabins can trap stale air quickly. Corrosion may begin behind lockers or around metal fittings.
Place intake vents where clean outside air can enter freely. Keep them away from exhaust outlets, fuel-fill areas, and enclosed corners. Avoid canvas, gear, dust, and insect nests.
Exhaust vents should usually sit higher than intake vents. Warm, damp air rises naturally. Keep exhaust paths clear and route engine-compartment ducts outside the hull.
Not always. Wind, rain, curtains, storage, and cabin shape can change airflow. Check lockers and corners for stale air. One opening may be insufficient.
Check airflow capacity, corrosion resistance, noise, and continuous-duty performance. Long ducts and sharp bends reduce airflow. Do not trust the box rating alone.
Run the fans and close cabin doors. Check whether air enters through the intended inlets. A tissue strip should move steadily. Recheck after adding cushions, screens, or storage.
Install a suitable carbon monoxide detector and test it regularly. A detector cannot replace fresh-air movement. Battery compartments need ventilation designed for their specific battery system.
Avoid crushed ducts, blocked vents, exposed wiring, and intake openings near exhaust outlets. Never assume a quiet fan is working. Test it. My early installations looked neat but were hard to inspect. Accessibility matters more.
Seek qualified help for persistent condensation, unusual odors, suspected exhaust leakage, or weak airflow. Follow current local requirements and the vessel’s technical guidance. Small doubts deserve attention.
Proper boat ventilation is essential for comfort, safety, and the long-term protection of the vessel. Why do boats need proper ventilation? Enclosed cabins can quickly accumulate heat, humidity, odors, and stale air, which may encourage mold, corrosion, and damage to fabrics or interior materials. In 2026, effective ventilation should be planned according to the boat’s design, cabin size, number of occupants, climate, and the location of sleeping, cooking, and storage areas.
This guide explains how to assess airflow needs and select suitable vents, fans, and passive or powered ventilation systems. It also covers the correct positioning of intake and exhaust components to promote steady air circulation without creating unnecessary noise or energy use. Finally, regular inspections, cleaning, moisture control, and timely upgrades help maintain reliable performance. A well-designed and properly maintained system keeps the interior fresher, drier, and more comfortable throughout the boating season.

Green Boat